3 minutes read
Follow these simple tips to create the most impactful and clear visual instructions.
Why create visuals for instructions?
Great visuals turn work instructions from something operators tolerate into something they actually use. They're no longer a “nice to have," but the difference between doing the job right the first time and creating rework, scrap, or safety risk.
Text alone slows people down because it forces interpretation. Strong visuals, such as annotated images, short videos, and step-by-step graphics, remove ambiguity. They show exactly what “good” looks like in context, at the moment of need.
That means faster training, fewer errors, and more consistent execution across shifts, lines, and sites.
The result: frontline teams move with confidence, and operations run with precision.
Visual vs. text-based instructions.
The human brain processes visuals 60,000 times faster than text. Around 90% of information transmitted to the brain is visual, and visuals have been found to improve learning by up to 400 percent.
Visuals are extremely important in instructional design. When you add visuals to your instructions, people can focus on the relevant details of each task and remove the potential ambiguity caused by text-only instructions.
Visual instructions vs. video
Step-by-step instructions with a combination of visuals - either static or gifs - and action-oriented text are:
- Easy to follow and understand (compared to video, where you need to pause and rewind)
- Hassle-free to update (compared to video, where you need to remake the entire thing if there's a change)
- Smooth to add additional information to each step, for example, what tools you need or what the safety precautions are.
SwipeGuide's founder Daan Assen explains the importance of clear visuals in instructional design.
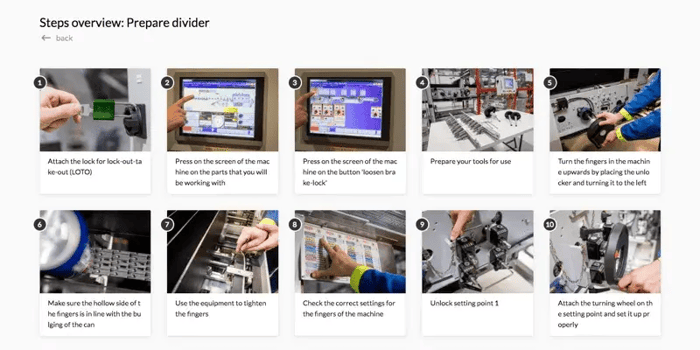
Create great visuals with these steps.
What exactly is a “clear visual” in digital work instructions?
Let's dig deeper.
1. Use the right equipment.
A normal smartphone is more than enough to create high-resolution visuals for your instructions. There's no need to invest in expensive professional equipment for your internal work instructions.
However, we've seen fantastic-looking instructions shot by professional photographers over the years, and especially if you use your instructions externally (e.g., when selling products that come with instructions), it can be worth it to invest in a photoshoot with a professional to ensure premium end results.

2. Ensure proper lighting.
Proper lighting makes a huge difference in the quality of your image production. Remember, mistakes caused by ambiguity can cost a lot of money. A portable handheld camera light (you can find one for $30) can make a huge difference if you're in a dark corner - or inside a machine - and need some extra light to ensure the best possible photo quality and clarity.

3. Pick the right level of detail.
Your users should be able to have a clear view of how to perform a task, even on a small screen.
- Make sure that your composition is right: the main focus point should be in the middle of the picture.
- Make sure that relevant product details for a step (e.g., buttons) are clear.
- When the context is important, make sure you shoot a bit wider to give users a sense of where the action needs to take place in context.

4. Remove distraction.
Sometimes our customers ask if they can reuse existing images for their instructions. While we like to be efficient, marketing images are quite different from instructions. In instructions, you want to keep the user's full focus on the task within in a certain step, without too much distraction in the background. 
5. Be consistent.
Consistency is key when creating instructions. As users swipe through a series of instructions, the steps should have the same look and feel to avoid confusion and distraction. Don’t vary in set-up and background. Make sure that images have a similar setting and level of detail to improve clarity and user experience.
6. Carefully consider motion.
Static visuals are great for straightforward tasks. However, sometimes you're not able to capture a complex motion in a shot. In these cases, you can shoot a series of 3-5 images to capture the motion and turn them into a gif.
Only if a motion is too complex to capture in a series of images, turn to video. A video is great, but has an unwanted "lock-in" effect. That is why we advise limiting the amount and length of video you use in instructions to a maximum of 7 seconds.

7. Use a model.
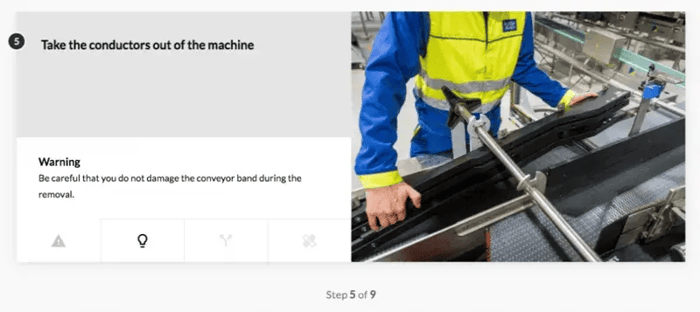
We always recommend using a model in your instructions. We see many cases where a hand model works well in conveying the instructional message clearly, for example, how to hold something or where to press.
Learn more about instructional design:
👉 Instructional Design Models Compared: Which One Should You Choose for Manufacturing Training?
👉 Why Video Work Instructions is a Bad Idea.
👉 Standard Operating Procedures (SOP) Best Practices & Guidelines.
Author

Annika Björkholm
The forever curious VP of Marketing at L2L. Big fan of continuous improvement and people with a growth mindset.
Read author profile